


对应路线图:Phase 4 (Day 120-140) | 内核 v6.6 | 代码出处:source/linux-stable/drivers/pci/,引用均标文件:行号
上一篇:P3-06 host_if | 下一篇:P4-02 MSI-X
一句话定位
Config Space 是设备与软件之间的"注册表":软件通过它知道设备是谁(Vendor/Device ID)、有什么能力(Capability 链)、占多大地址(BAR)。而 BAR 解码的玄机在于——BAR 寄存器同时承担"地址寄存器"和"尺寸寄存器"两个身份,内核用"写全 1 读回"让它现出原形。
真实源码精读
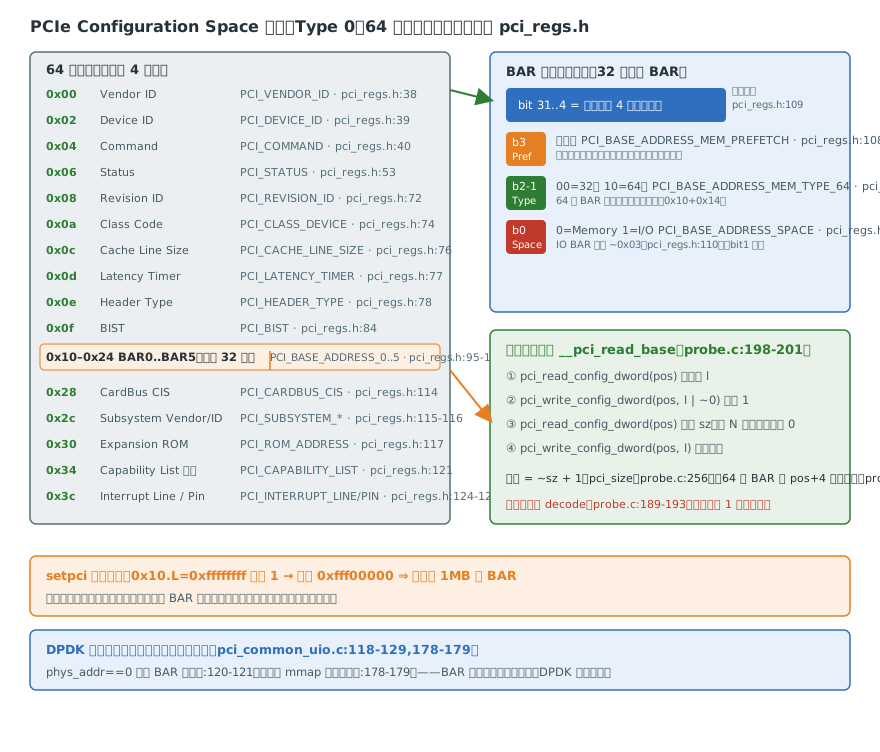
① 64 字节头部:偏移定义在 include/uapi/linux/pci_regs.h:38-125
#define PCI_VENDOR_ID        0x00    /* 16 bits */
#define PCI_DEVICE_ID        0x02    /* 16 bits */
#define PCI_COMMAND        0x04    /* 16 bits */
// ...省略(STATUS 0x06、REVISION_ID 0x08、CLASS_DEVICE 0x0a ...)
#define PCI_BASE_ADDRESS_0    0x10    /* 32 bits */
// ...省略(BASE_ADDRESS_1..5 依次 0x14/0x18/0x1c/0x20/0x24,pci_regs.h:96-100)
#define PCI_CAPABILITY_LIST    0x34    /* Offset of first capability list entry */
#define PCI_INTERRUPT_LINE    0x3c    /* 8 bits */
#define PCI_INTERRUPT_PIN    0x3d    /* 8 bits */
BAR 寄存器的位布局(pci_regs.h:101-110):bit0 区分空间(1=I/O, 0=Memory)、bit1-2 编码类型(PCI_BASE_ADDRESS_MEM_TYPE_64 = 0x04 表示 64 位 BAR 占两个寄存器)、bit3 是否 prefetchable,其余位才是地址。
② 枚举第一步:读 Vendor/Device ID 判断设备是否存在(probe.c:2494-2517)
static struct pci_dev *pci_scan_device(struct pci_bus *bus, int devfn)
{
    struct pci_dev *dev;
    u32 l;

    if (!pci_bus_read_dev_vendor_id(bus, devfn, &l, 60*1000))
        return NULL;

    dev = pci_alloc_dev(bus);
    if (!dev)
        return NULL;

    dev->devfn = devfn;
    dev->vendor = l & 0xffff;
    dev->device = (l >> 16) & 0xffff;

    if (pci_setup_device(dev)) {
        // ...
        return NULL;
    }
    // ...
}
一次 dword 读偏移 0x00 就完成"设备在不在"判断:全 0xffffffff 表示该 devfn 悬空。存在则 pci_setup_device(probe.c:1867)继续读 header type、class 等并解析 BAR。
③ BAR 尺寸探测:写全 1 读回(probe.c:176-247,__pci_read_base 节选)
    mask = type ? PCI_ROM_ADDRESS_MASK : ~0;
    // ...
    pci_read_config_dword(dev, pos, &l);
    pci_write_config_dword(dev, pos, l | mask);
    pci_read_config_dword(dev, pos, &sz);
    pci_write_config_dword(dev, pos, l);

    /*
     * All bits set in sz means the device isn't working properly.
     * If the BAR isn't implemented, all bits must be 0.  If it's a
     * memory BAR or a ROM, bit 0 must be clear; if it's an io BAR, bit
     * 1 must be clear.
     */
    if (PCI_POSSIBLE_ERROR(sz))
        sz = 0;
    // ...
    if (res->flags & IORESOURCE_MEM_64) {
        pci_read_config_dword(dev, pos + 4, &l);
        pci_write_config_dword(dev, pos + 4, ~0);
        pci_read_config_dword(dev, pos + 4, &sz);
        pci_write_config_dword(dev, pos + 4, l);
        // ...
}四步协议:读原值 → 写全 1 → 读回 → 还原。读回值中低 N 位被硬件"钉死"为 0,N 就是尺寸的对数——设备应答 0xfff00000 说明它是 1MB 的 BAR。注意写全 1 前内核先关掉 decode(probe.c:189-193),防止探测期间把配置写当成正常访问。64 位 BAR 占两个寄存器,第二个寄存器在 pos + 4 重复一遍(probe.c:239-243)。
④ 树形枚举:pci_scan_bus → pci_scan_slot → pci_device_add
pci_scan_bus(probe.c:3308)挂上 ioport/iomem/busn 三类资源后创建根总线,调 pci_scan_child_bus 深度扫描。pci_scan_slot(probe.c:2745-2770)按 function 递增探测:fn 0 不存在且不在 hypervisor 透传环境就 break——Fn 0 是一个 slot 的"存在性锚点"。每个设备最终进 pci_device_add(probe.c:2609),挂到 bus->devices 链表(:2642)后由 driver core 触发匹配和 probe。
🐧 内核机制对照:同一份 BAR 信息,两种消费方式
| 环节 | 内核(drivers/pci/) | DPDK(drivers/bus/pci/) |
|---|---|---|
| 枚举入口 | pci_scan_bus probe.c:3308 | 用户态读 /sys/bus/pci/devices/ |
| 存在性判断 | 读 offset 0x00 dword,probe.c:2499 | sysfs vendor/device 文件 |
| BAR 尺寸 | 写全 1 读回,probe.c:198-201 | 直接读 sysfs resource 文件 |
| BAR 映射 | ioremap(内核态地址) | mmap,pci_common_uio.c:178-179 |
| 空 BAR 跳过 | 尺寸 0 则 fail,probe.c:253-254 | phys_addr == 0 continue,pci_common_uio.c:120-121 |
本质区别:内核替所有驱动把 BAR 解析好、放进 pci_dev.resource[](pci.h:421);DPDK 在用户态只能拿到已分配好的物理地址,用 mmap 直接映射设备寄存器——这也是 DPDK 不写内核驱动就能操作网卡的前提。
面试 3 问
- 内核怎么测 BAR 尺寸? → 写全 1 读回(probe.c:198-201),读回值取反加一即尺寸;写之前先关 decode 防误访问(probe.c:189-193);64 位 BAR 在 pos+4 再做一遍(probe.c:239-243)。
- BAR 低 4 位为什么不是地址? → bit0 空间类型(pci_regs.h:101)、bit1-2 类型编码含 64 位标志(pci_regs.h:104-107)、bit3 prefetch(pci_regs.h:108),掩码
PCI_BASE_ADDRESS_MEM_MASK = ~0x0f(pci_regs.h:109)。 - 扫描时如何避免误判"幽灵设备"? → 悬空 devfn 读回 0xffffffff,
pci_scan_device直接返回 NULL(probe.c:2499-2500);读回全 1 也用于识别坏设备(probe.c:203-210 注释)。
🔧 动手实验
用真实 NIC(如 ixgbe 网卡)做一次"手写 __pci_read_base":
lspci -nn -v -s 01:00.0              # 记录 BAR0 地址与尺寸(如 64-bit, 4MB)
sudo lspci -xxxx -s 01:00.0 | head   # 前 64 字节逐字节对表解码
sudo setpci -s 01:00.0 0x10.L        # 读 BAR0 原值
sudo setpci -s 01:00.0 0x10.L=0xffffffff
sudo setpci -s 01:00.0 0x10.L        # 读回:低 N 位为 0,验证尺寸
sudo setpci -s 01:00.0 0x10.L=<原值> # 必须还原!不还原设备可能失效
同时 insmod code/dpu_dev/01_pci/pci_scan.ko 看内核侧 pci_resource_start(pdev, 0) 给出的 BAR0 值是否与 lspci 一致。数据落点 perf-data/P4/01-config-space.txt(lspci 原文 + 手工解码过程 + setpci 三次读数)。
评论 (0)